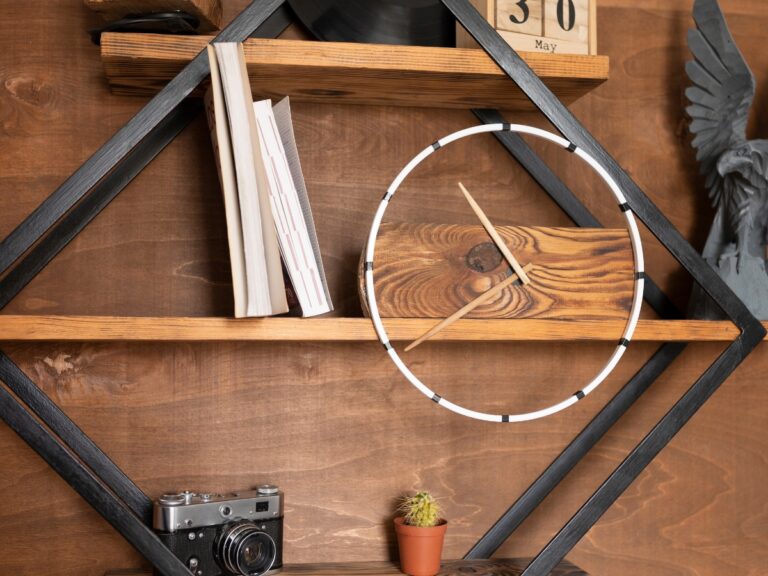
Floating shelves are an excellent way to amp your space. They are fantastic at keeping your space organized, freshened up, and spacious. You can also use them to give an esthetic touch to your home, office space, or recreational facility.
That’s not all. Floating shelves are also easy to make. With a simple DIY woodworking plans, you can end up with breathtaking designs. In this post, I will show you how to make floating shelves. First, let’s start with what you require to make this work.
Tool and Materials Needed:
- 1/2 inch by 8 inches by 8-foot lumber
- 1/2-inch oak dowel – 36-inch length
- Minwax Gel Stain
- Minwax Pre-Stain Wood Conditioner
- Polyurethane Spray
- Circular saw
- 1/2-inch drill bit
- Orbital Sander
- Spirit Level
- Speed Square
- Stud Finder
- Tape Measure
- Countersink Drill Bit Set
- Dead Blow Mallet
- Sander and a half-inch bit
- Mini Miter Box and Saw
Step I: Cut the Lumber in Three Equal Parts
Prepare the Lumber for Cutting
Take the 1/2 inch by 8 inches by 8-foot lumber/ wood and set it on the material support stand. Add a small wooden piece under it. The wooden piece will act as support that the cut pieces will lie on so that they don’t fall.

G-Clamp and Material Support Stand
Measure the lumber’s depth. This is very important. With the exact lumber depth, you will know what depth your blade should go.
The blade’s depth should be shy off the support. So, adjust the circular saw’s blade depth. This enables you to cut only the lumber and not the support too.

Circular Saw
Cut a Straight Edge on the Lumber
Some timber will come with chipped edges. Remove these first. When making floating shelves, you need equally cut pieces with smooth and straight cuts.
Take your speed square and a pencil. Use them to mark a small section towards one end of the lumber. Draw a straight line on this section that cuts across the surface of the wood.

Cut it out using the circular saw. This should give you a plain and smooth cut and remove any chipped corner. Remember to watch the depth of your blade as you cut so that you don’t go through the support.
TIPS: To maintain the perfect blade depth, lift the saw a bit against the lumber’s depth before cutting. Then fix it in there. This ensures that it barely touches the support as you rip through the lumber.
Cut the Lumber into Equal Pieces
You should cut the timber into three equal parts. This means that the final length of each piece will be shy of 31 inches. Here is a guideline to help you.
- Don’t remove the lumber from the material support.
- Take your tape measure and measure three equal parts
- Use a pencil to mark the length of every piece slightly.
- You can make the marks with a dot at the edge of the lumber.
- Now take the speed square and draw a continuous line over the marks
- Make sure the line you draw runs across the visible surface of the lumber.
- This continuous line will mark where you cut. It will also help you to control your cut.
- Now cut every piece independently.
Start with the section where you had removed the chipped edge. Use the circular saw to cut out the marked length of the first piece.

Now remove the first piece and adjust the remaining piece of lumber to reveal the next mark. Repeat the process and cut the second piece.
Do the same with the third piece too. You should end up with three boards. If you find a small piece remaining at the end of the last board, dispose of it off.
Step II: Cut the Dowels into Exact Sizes
In this case, we are using a 36-inch dowel for all three shelves. Use the ruler and mark the dowel to four-inch pieces. You will end up with nine equal pieces.

Mini miter box and saw
Use the mini miter box and saw to cut through the nine pieces of dowel. Set the nine resultant dowels aside. Every shelf will be held by three equal pieces from these nine pieces of dowel that you end up with.
TIP: A dowel is a thin wooden pin or peg that’s used to hold the shelves’ pieces on the wall. A dowel is fitted in a hole in the wall before the shelves are set up. They prevent the shelves from slipping or moving.
Step III: Mark 3 Locations for the Dowel

Turn the board on its 1/2 inch side and mark the locations where the dowels will be fitted in. My favorite position is to mark the first location at the center of the board. Then I will follow this with one more mark two inches from every end. This will result in three marks for every plank.
Repeat the same for the other two planks.
Step IV: Drill the Dowel Holes
Use a square ruler and draw a straight line over the locations of the dowels. Then, find the center point of every dowel line that you have marked on each board. It is this central point that we will drill to create a hole that the dowel slides into.

Screwdriver
To drill the hole for the dowel, follow this routine:
- Take a half-inch drill bit
- Set it to the dowel’s four-inch length
- Use tape to mark the end of the four inches along the bit
- This should set both the dowel’s depth and how far the bit should go.
- Take the screwdriver and create a small indent on the marked center points
- Drill through the indent to the marked depth for all the boards
- Use the taped level as a guide so that you don’t drill too much
- Finally, use an orbital sander and sand the drilled area to make it clean and smooth

Drill Bit
TIP: Creating the indent on the pre-marked center points where the dowel goes helps the bit to stay focused. If the bit strays, it will prevent you from having a perfect shelf alignment.
Step V: Make an Inch-And-A-Half Cut on the Drilled End

Guy and Circular Saw
Once you juror the holes, make an inch-and-a-half cut from the same side. Let the cut run from one edge of the plank to the next while ripping the dowel holes into one and a half-inch holes.

Circular Saw and Material Support Stand
You can use the guy that came with a circular saw to set the right measurement. But if you can access a table saw the process should be easier.
Step VI: Mark the Part You Just Ripped Out

It is easy to mix up the one and a half inch pieces that you just cut out. Mark each one of them with an identical mark to the plank that they have been cut from. This will help you to know which side goes where and which piece goes on which piece.
Step VII: Test the Dowel in the Holes
The dowels should go through the holes that you just drilled smoothly. However, we used the half-inch bit and half-inch dowel. This makes it hard.

Countersink Drill Bit Chuck
For the dowels to slide in and out of the shelf holes, we will sand the one-and-a-half-inch side that goes into the shelf. They shouldn’t be too thin, no. We need them to have enough grips but not cramp as they go in.
Here is the best way to sand this part:
- Fit in one section of the dowel to the chuck of your drill
- Leave the other one and a half-inch outside the drill
- Take sandpaper and hold on one hand – the hand without the drill
- Turn on the drill and let it roll over the sandpaper
- This should sand the dowel just enough to slip through the hole
- Do this for all the dowels
The other section that you have not sanded shouldn’t be a problem. We are going to hammer that into the ripped one and a half-inch of the board.
Step VIII: Sand the Set-Up

Orbital Sander
Sand all the planks to remove chipped and rough edges. Make sure you sand every corner to remain with smooth surfaces. Use the orbital sander.
Step IX: Put Back The Pieces Together

Put all the pieces back together. Line up the pieces and drop the dowel pins to attach the two ripped wood planks. Use a mallet to hammer them in and get a tight hold.

Dead Blow Mallet
The dowels should slip in and out of their holes entirely. Do the same for all the planks. You will end up with three shelve planks as before.
Step X: Lock the Shelve in Place
To lock the shelf in place, install a screw right through the dowel and into the wooden plank. Make sure the shelf is tight before you put the screw. So, set up a clamp at this area. Then, pre-drill and countersink the screw.

Countersink Drill Bit and Clamp
You can add one screw on each dowel. However, one in the middle should work just fine. Do the same for the other shelves.

Step XI: Apply A Pre-Stain Conditioner
The pre-stain conditioner helps you to avoid any blotchiness once you stain your shelves. I prefer the Minwax pre-stain conditioner, but you can get a good option from your local hardware. Allow the conditioner to dry before you stain. You can also sand it down a little if you want.

Step XII: Apply the Stain
There are a few ways to apply the stain. My favorite technique is the wipe-on method. In this method, you will apply the stain and then remove it with a rag. I also like to use the Minwax gel stain. But you can buy yours.

Step XIII: Put a Topcoat
Apply two to three layers of topcoat. You can use a spray-on polyurethane and sand lightly between every coat. If not, you can use the brush on method. The spray version is the best because it is less messy.

Spray-on polyurethane
Step XIV: Mount the Shelves
The first step to mounting the shelves is to add a few holes in the back bracket. Make sure the bracket is leveled before you add the holes.

Spirit Level
Next, find the stud in the wall. You can use a stud-finder. If you don’t have a stud-finder, use a screw and wall anchor setup.

To speed up the process, transfer the marking over to the other two pieces of wood. Put some cross marks on these.

Speed Square
Now make some holes on every bracket and onto the marks that you just made. All you need to do is drill about half an inch in. This will help you to send the screw through the wood and into the wall. It will also prevent any rough fitting when you slide the shelves planks in.

Screwdriver
Put the wooden bracket over the mark that you put on the wall. Then, screw into the stud or the wall anchor if you didn’t have a stud-finder.

Spirit Level and Screwdriver
Align the other side of the bracket and screw too. Then repeat the same process for the remaining shelves.

Take the shelve plank and slide on top of the dowel to fit the shelf into place. Use a safety screw or scrap wood for proper spacing.

You should end up with a floating shelf.